
I've been super sick the last few days, but since I have a friend coming to stay with me later this week I spent this afternoon doing a major clean-up of my bedroom. Part of that was finishing an organizational project that has been about 1 year in the making.
This is somehow organizing my massive collection of jewelry in a way that makes them easy to see, but not take up much space (I have a very tiny room). I wanted something that could handle rings, necklaces, pendants, and earrings. This was complicated by the fact that I don't have hooks or posts on any of my earrings, so lots of ideas don't work for me. I also hoped to put my small but nice pin collection in the same place.
Anyways, after a visit to the dollar store, just under $10.00 and a free bulletin board from work I came up with this: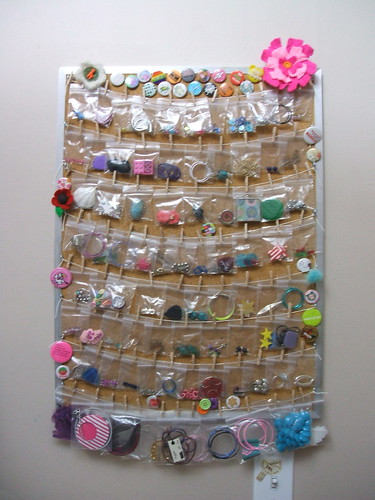
Here are some basic instructions:
1. Put jewelry in mini zip-lock bags. Mine are mostly 2 inches, but some larger 3 inch ones at the bottom. Some bags have two or three tiny similar pieces.
2. Get bulletin board (BB) of appropriate size.
3. Put hooks about every 2.5 inches along the sides of the BB.(or about 0.5 inches than the size of your baggies.
4. Tie string to each hook attaching it to the hook on the opposite side of the BB. Make sure the string is as taut as possible.
5. Using mini clothes pins, hang baggies along string. Don't be afraid to overlap them - this allows for a smaller BB.
6. Hang on wall (If your BB doesn't come ready for this the dollar store also has picture hanging stuff that you can attach to the back of it.)
7. Add pins along edges for convenience and beauty.
Organization feels so good!
Sunday, December 30, 2007
Jewelry Organization
Monday, December 24, 2007
Photoless Pattern
So last night I quickly wipped up a crocheted bookmark for my neice. I wrote the pattern as I went, planning on posting it here, but then wrapped it up with a bookstore giftcard before I took pictures.
I'll take pictures when she opens it tonight, but for now here is the pattern. It's a perfect quick-last minute add on. (If you don't have all sorts of other crafts that are still needing to be finished like I do that is.)
Yarn: Crochet thread (mine is from Daiso and only has Japanese writing, or I'd give more info). I did mine in all one colour but it would also look great in two colours, one for the flower and then green for the "stem".
Hook: 3.25mm. But this is flexible. Up or down 0.25 shouldn't matter in the least.
Start by working the flower in the round.
-ch 2, 6sc into 1st ch. (6) Do not join.
-2sc into each sc of prev. rnd. (12) Do not join.
-sl st into 1st sc of prev rnd, ch 5, sc into nxt sc. *ch 5, sk 1 sc, sc into nxt sc* repeat * 4 more times. (6 ch5 spaces)
-sl into 1st ch 5 sp *sc 7 into ch5 space* repeat * for rest of ch5 spaces. (42) sl st to join.
-*sc, 2 hdc, dc, 2 hdc, sc* repeat * around (42) sl st to join.
-sl st in next 2 st. (If you are using a spearate colour for the stem change it here.) sc in nxt 3 sts. ch 1, turn (You will now be working rows instead of rounds.)
-sc across, ch 1 turn. (3) repeat until stem is 2.5 inches (this took me 24 rows.)
-ch 5, sl st in last sc of prev. row. Turn. (1 ch5 space.)
- sc 7 in ch5 space (7) ch 1, turn.
-sc, 2 hdc, dc, hdc, sc (7)
Fasten off, wet block, startch if you want it stiff, and weave in ends.
Thursday, December 13, 2007
Reversible Fabric Baby Shoes Tutorial

To start - the pattern/template is available at http://www.maked.ca/shoepattern.pdf .
And similarly a pdf copy of this tutorial is available at http://www.maked.ca/shoetutorial.pdf .
OK, enough blabber.
.JPG)
Cut out your pieces. For each piece you want two pieces of each colour (4 in total). Shown here I have just one piece of each colour. This is what you need to make one shoe. The pieces are such that you don't have to worry about flipping them over or anything. They're symmetrical. So just cut the shapes out and they'll work.
Not shown, you'll also need two pieces of elastic about 3/8" wide and about 3.5" long.
All seams are 1/4 inch seam allowance.
.JPG)
Place one of fabric A and one of fabric B right sides together. Sew them together along the longer straight edge.
.JPG) Fold the heel pieces over the seam so that they are now wrong sides together.
Fold the heel pieces over the seam so that they are now wrong sides together.Now you sew a seam to make a casing for the elastic. My elastic was 3/8" wide so I sewed my seam about half an inch away from the edge.
Your seam will depend on the width of your elastic. Try not to use an elastic that is very thin as this might cut into the baby's feet. Too wide and the elastic won't hold the shoe snugly above the heel.
.JPG)
Attach a small safety pin the the edge of the elastic to help you push it through the tunnel.
.JPG) Push the safety pin through until the other end of the elastic is just poking out. Do not push the elastic the whole way through. At the pictured stage, the safety pin is hidden inside the fabric.
Push the safety pin through until the other end of the elastic is just poking out. Do not push the elastic the whole way through. At the pictured stage, the safety pin is hidden inside the fabric..JPG) Now we make a sandwich.
Now we make a sandwich.It goes:
Fabric A toe, right side up
Heel piece , fabric A down, fabric B up, elastic towards the middle, elastic poking out the side
Fabric B toe, right side down
Start sewing a seam along the flat edge of the toe pieces, catching the heel piece (including the elastic) as you sew.
.JPG) Stop after you've sewn over the heel piece, a little less that halfway down the toe piece.
Stop after you've sewn over the heel piece, a little less that halfway down the toe piece.Here's where it starts to get tricky.
While everything is still in the sewing machine, pull the elastic and scrunch up the heel piece so that the free end of the elastic pokes out the other end of the heel piece.
.JPG) Pull the heel piece around so that it's edge is lining up against the edge of the toe pieces.
Pull the heel piece around so that it's edge is lining up against the edge of the toe pieces.I like to put a little pin at the end, hold the pieces together with my left hand and pull on the safety pin with my right hand.
Finish the seam.
.JPG) This is how it should look when the seam is done.
This is how it should look when the seam is done..JPG)
Fold the two toe pieces over.
Now it should look like this.
Ooooh, it's starting to take shape.
.JPG) Now we make another sandwich.
Now we make another sandwich.The shoe top is going to get squished in between the two sole pieces.
It goes:
Fabric A sole, right side up
Shoe top, fabric A down, fabric B up
Fabric B sole, right side down
.JPG)
Pin often, attempting to keep the fabric distribution relatively even. I like to start with pins at the mid point of the toe and the mid point of the heel and then go from there.
Also I find it works better with smaller pins. Here I'm using mini quilt appliqué pins. They work great.
.JPG)
Sew around the shoe leaving an opening. I like to leave about an inch at the side of the shoe because that's where it's straightest and going to give you the least amount of trouble.
.JPG)
Fold back one of the sole pieces away from the opening. Sew the remaining pieces along the seam line.
Now, through that little opening, you turn the shoe right side out.
.JPG)
We're almost there!
Slip stitch that opening closed.
You're done! Yay!
Find a little tootsie to show off your new creations.
.JPG)
Saturday, December 08, 2007
Spent
It has been a full day of craft fairs for me. I'm pooped. There we four craft fairs along Main so I started at the top and worked my way down. There was so much amazing  stuff and I got so many awesome x-mas gifts. It made following through on my "buy handmade" pledge a cinch.
First I went to the fair at the Heritage Hall. I found the perfect gift for my mother-in-law and something for the little person growing inside my sister-in-law. I also saw an amazing jeweler, Ginger Pottin. She does beautiful work with bits of leather and copper enameling. I've never seen anything quite like it. My favorite piece was the one pictured to the right.
Then I walked up the Blim to check out the Vancouver Craft Mafia. It was small but there was some super cute stuff and I met some really neat people. I especially enjoyed chatting with Lia of Goodmorning, Morning. I had two favorite bags. That's one of them on the left. Adorable right? Yeah. She uses a lot of thrifted fabrics and has a lot of different styles, so her bags are very unique. Not to mention beautiful and practical.
Then it was a bit of a walk down to the skate shop Anti-Social where Seamripper's was having a do. At first it didn't look like I had the right place, or maybe I had the day wrong but I asked the girl at the desk and she says "oh yeah, it's just in the back there". Umm okay. So I walk past the skate ramp room through this little hallway and emerge into a crafty mecca. It wa s the coziest atmosphere I've ever seen at a craft show. And though it was small, there was a lot to take in. The first table I went to was Thistle Town. I had talked to Claire at a show at Heritage Hall last weekend and had told her that I was looking for an elk stuffie. Well I walk into the room, skip over to her table and right away I see little felt horns sticking up out of the plush pile. she had made two, both super adorable, and I immediately claimed one as my own. I haven't taken a picture of him, but I picked out another of my favorites from her site to show you. Aren't those ears the cutest? I think so!
OK, so then, across the room I see Jaime of Crookkid. I met Jaime at the West End Community Center Craft Show where I bought like half her stock of cards because I loved them so much. I was happy to see her at Seamrippers because I felt it was more her crowd, and  I was extra happy to see that she now has an etsy shop. I'm so excited that I can now get her stuff without waiting to see her at a fair.
After the Seamrippers I walked a little further down Main and dropped into ShinyFuzzyMuddy. There was some amazing stuff there. It was a real artizan market.
I have to say, after all that I was pretty pooped. But it left me feeling really in touch with the craft community, and also left me with tons of amazing gifts for people. I've always loved handmade goods, but taking the handmade pledge has nudged me to seek handmade when it normally wouldn't occur to me. And I have to say that I am consistently overjoyed with the results. I feel so much better about my purchases, have so much more fun shopping, and get the best reactions from my giftees. Not to mention it hasn't been any more expensive.
Saturday, December 01, 2007
It's Snowing (yarn)!
So I think this morning qualifies as the first real snowfall in Vancouver for the season. It's already melted from how it was when I got to work this morning, but downtown gets the least amount of snow in thw whole lower mainland. I'm sure in the suburbs there is still much to be found.
This title can also be about how I've been feeling about crochet lately. I got invited to Ravelry just about two weeks ago so I have been super motivated to finish projects, plan projects, and organize my stash.
I finally got to blocking the "Cold Shoulders" Capelet I mentioned a few weeks ago. I still need to buy a matching ribbon so I can actually wear it, but it's complete and I love it. 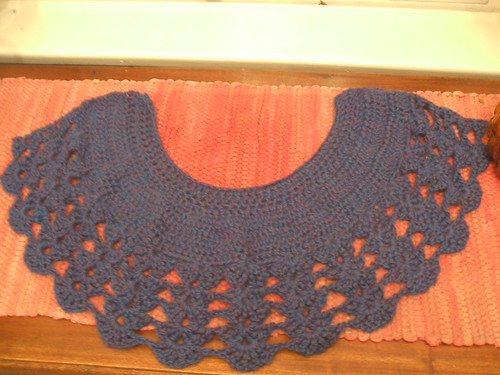
I also did a bookmark for my mom for Christmas. It is using crochet thread from Daiso, a 1.50 hook, and a fan lace pattern I found on ravelry. 
I also made a scarf for a friend, a hat with awesome bamboo buttons for myself. And folowing the trend I bought a bunch of hand-dyed roving to spin and placed a knit picks order to make a top and scarf from the CrochetMe book. I also went to a close-out sale for a yarn shop in Burnaby and bought some cotton/wool blend for a shawl for my mom, and 10 balls of merino/silk blend for something. It was just so soft and shiny that I couldn't resist.
Also, as Lisa Mentioned we are almost out of the Novel Notebooks. This doesn't mean we will not have them again. We are rethinking the binding and the page amounts, and will be incorporating lined pages into the new design. Watch for them in the new year.


